Logo

What is Ideate Sticky?

Easily Disseminate Non-BIM Data to Revit Project Team Members.


Manufacturer’s details, general notes, specifications, and other types of non-BIM data are critical to project success but those items don’t always have a direct relationship with an element in a Revit model. How can you easily disseminate them to the Revit project team members?


With Ideate Sticky!


We introduced Ideate Sticky in 2015 to link Excel spreadsheets to Revit projects as simple Revit table schedules. Over the past eight years, we have added many new features, and now users can create and place “Stickies” within a Revit project that represent the contents of a Microsoft Word, Excel, or Adobe PDF files. Ideate Sticky now also supports Absolute paths, Relative paths, and Autodesk Cloud locations for data locations.


Sticky Schedules vs. Sticky Images 

What is Ideate Sticky

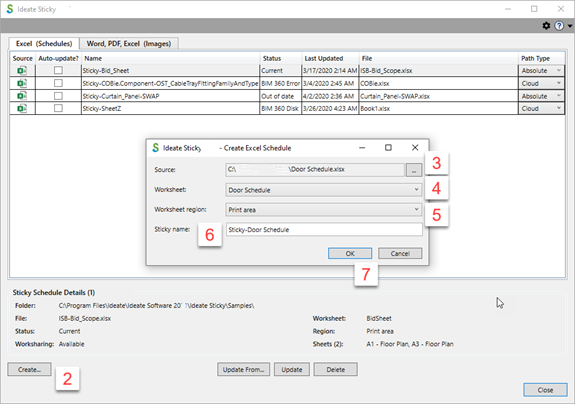
Stickies created and placed into projects as native Revit Schedule elements offer several benefits and a few limitations. When you create a new Sticky schedule, you create a new Generic Model Schedule that has header text but no body text. Learn more 


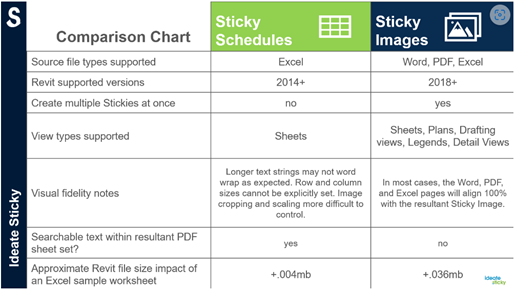
We recommend Sticky images when the size of the Excel columns and rows is important, because they offer greater visual fidelity of documents that include long pieces of text or many images. Learn more


For details and examples, read this blog post

It's Easy to Create Stickies


With our intuitive user interface, you’ll be a pro at creating Stickies in no time. Here are the steps:


Step-by-Step Instructions

What is Ideate Sticky


  1. Select a Source File


  1. Open the sheet or view where you want to place the Sticky
  2. Launch Ideate Sticky
  3. Stay on the default Excel (Schedules) tab to create a Sticky Schedule. If you want to create a Sticky image, click on the  Word, PDF, Excel (Images) tab
  4. Click Create in the lower left-hand corner (Item 2 in the image above)
  5. For Schedules, pick the “...” button by the Source box at the top (Item 3 in the image above) select a file to import by
  6. For Images, select the desired source file

   2.  Specify the Source Details

  1. Schedules

  2. Identify the worksheet the Excel file that contains the data to import (Item 4 in the image above)
  3. Define the area to be imported in the worksheet by selecting the region (Item 5 in the image above)
  4. The Sticky name will be displayed in the Project Browser under the Schedule folder (Item 6 in the image above). Review the name for accuracy
  5. Select OK (Item 7 in the image above)
  6. Review Auto-update options. Learn more by reading Update the Sticky in Revit Projects with Ideate Sticky

  7. Images

    You can specify the Excel source documents by selecting the worksheet regions in any worksheet as well as the DPI value. The Name column represents the available regions that include saved Print Areas and named regions. View and edit the ranges in Excel from the Formulas>Name Manager dialog.


What is Ideate Sticky


Color Overrides:


Image Stickies can be created with a Color, Grayscale, or Black and White override. Black and white will take precedence over the drop-down selected when creating the Image Sticky. Learn more by reading this blog post


DPI Overrides and Transparency:


NOTE: Higher dots per inch values will result in larger image files, which could affect the Revit model size.


Want to learn more about Ideate Sticky? Check out our Help files and our Video Library.

Explore recent posts

15@15: Unveiling the Invisible: A Deep Dive into Ideate Xray
29 Apr, 2024
TRAINING - VIDEO | In this 15@15 recording, you'll learn how to leverage Ideate XRay, a tool within our IdeateApps solution, to unravel the mystery of why a Revit element remains hidden in a specific view. Embark on a this 12-minute journey of discovery as we guide you through the fundamental steps of utilizing Ideate Xray effectively.
Live From DC: Unlock the Time-Saving Features for Revit with Ideate Software
26 Apr, 2024
TRAINING - VIDEO | Join Richard and Glynnis LIVE from Washington DC, for an enlightening session on how to revolutionize your Revit workflows with the newest offering from Ideate Software - Ideate Automation.
Beyer Blinder Belle Architects' Solution Customization for Streamlined Design
22 Apr, 2024
SUCCESS STORY - VIDEO | Beyer Blinder Belle Architects were able to customize our Revit solutions to meet their company's specific needs. Thanks to our personalized solutions, BBB's team was able to have Ideate Automation run weekly exports overnight and export PDF files as sets by drawing type, run Ideate Automation command lines in Microsoft Power, and more.
15@15: Look It Up! Custom Dictionaries in Ideate SpellCheck
15 Apr, 2024
TRAINING - VIDEO | In this 15@15 recording, you'll uncover the secrets to enhancing your documentation quality control process in Revit. Learn how to seamlessly add standard company/client standard abbreviations to a Revit custom dictionary, coordinated with Ideate SpellCheck.
Show More
Share by: