Revision in Revit with Ideate BIMLink
Use Ideate BIMLink to create new Revision sequences in Revit by adding a NEW value in the Id column within an Excel file created from the Revit Sample Link Files with Ideate BIMLink, “Revisions-Create-NEW.”
This method is similar to those used to create new elements, such as Create New Rooms or Spaces in Revit using Excel in BIMLink, and it is an excellent way to synchronize revision data across linked files.
Reviewing the Revision Sequences in the Parent File
- Open a project in Revit. For projects with linked files, choose the primary source of the revision data.
- From the “View” tab in Revit, select “Revision” from the “Sheet Composition” panel.
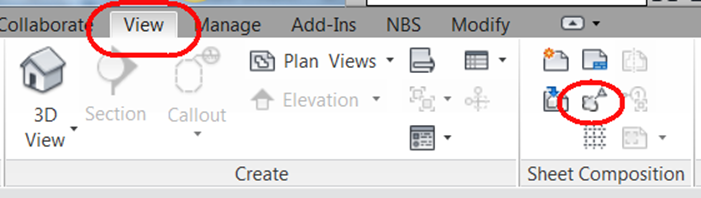
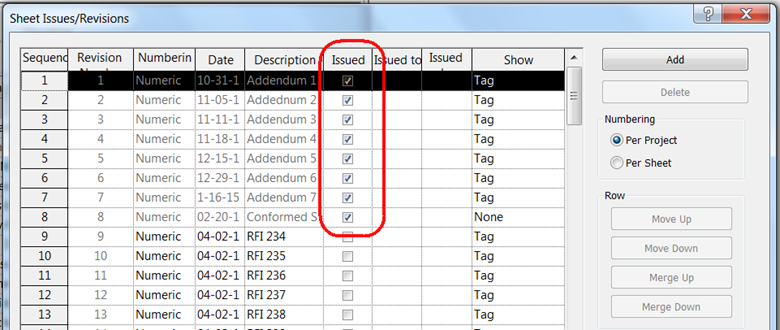
3. Review all Revision sequences, noting that sequences that have been issues are not editable. If needed, uncheck “Issued” before using Ideate BIMLink. Fields that will be editable for Revisions that are not Issued are: Date, Description, Issued, Issued to, and Issued by.
Editing Revision Data in the Parent File
- Launch Ideate BIMLink.
- Select “Load Revit Sample.”
- Select the built-in link called “Revisions.”
- After reviewing the Properties, hit “OK.”
- Save the results to Excel by selecting “Export Revit Elements to Excel.” Open the Excel file.
- Edit data within a cell that is white. Reminder: Only unissued Revit Revisions can be edited. Due to the nature of the Issued property, we don’t recommend that you edit this property if you are also trying to edit other properties from the same sequence.
- Save the Excel changes and then select “Import Excel Values into Revit” in Ideate BIMLink to complete the changes.
- If you made any changes to the “Issued,” you should either 1) use Ideate BIMLink to edit only this property, or 2) manually reset the property via the Revision button in Revit.
Coping Revision Data to a Linked File
With Revision data setup to your standards, use the same data to create matching data in another file. In the instructions below, we assumed that the Revision sequences have not been setup.
- Open the Revit project file into which you’d like to mirror the Revision sequences defined in the original parent file.
- Launch Ideate BIMLink.
- Select Load Sample.”
- Select the built-in link, “Revisions.”
- After reviewing the Properties, hit “OK.”
- Hit “Export” to save the results to a new Excel file. Open that Excel file.
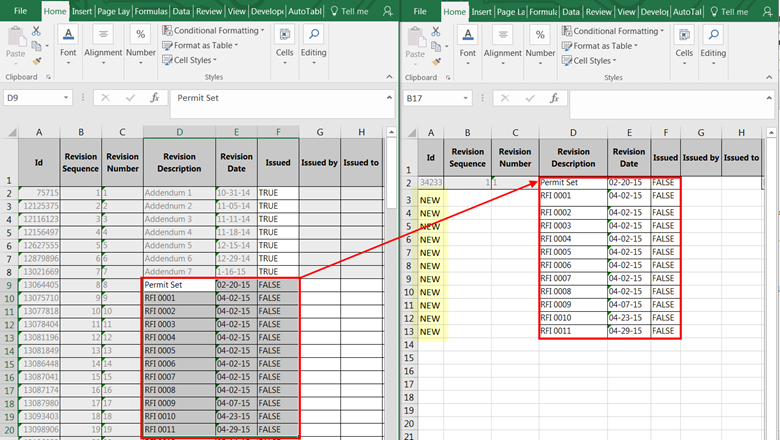
- Copy the Excel data from the original file to the new file. NOTE: Don’t copy the data from Column A, B, or C.
- In Column A, write “NEW” for each new Revision sequence to be created within this second Revit project file. The values for Column B and C will automatically be by Revit during import.
- Save the Excel changes and then select “Import” in Ideate BIMLink to complete.
Explore recent posts


