How to Create a Sticky
With a Sticky, you can represent the contents of a Microsoft Word, Microsoft Excel, or Adobe PDF file in a Revit project.
Before creating a sticky, review the differences between Sticky Schedules and Sticky Images.
How to Create a New Sticky
Select a Source File
- Open the sheet or view where you want to place the Sticky, and then launch Ideate Sticky from the Ideate Software tab in Revit.
- The default tab will be Excel (Schedules). Stay here to create a Sticky Schedule. To create a Sticky Image, change it to Word, PDF, Excel (Images)
- Hit the “Select Create...” button in the lower left corner.
- Schedules: Select a file to import by picking the “...” button next to the Source box at the top.
- Images: Select the desired source file.
Specify Source Details
Each supported file type has a different set of options to help define what should display inside Revit:
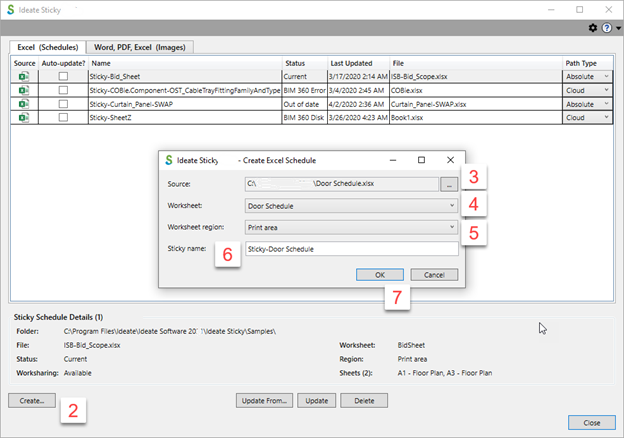
Excel (Schedules)
- Identify the worksheet in that Excel file with the information you want to import.
- Select the worksheet region to define the area to be imported in the worksheet.
- Review the Sticky name. It’ll be what displays in the Project Browser under the Schedule folder.
- Select “OK.”
- Review the Auto-update options. Update the Sticky in Revit Projects with Ideate Sticky
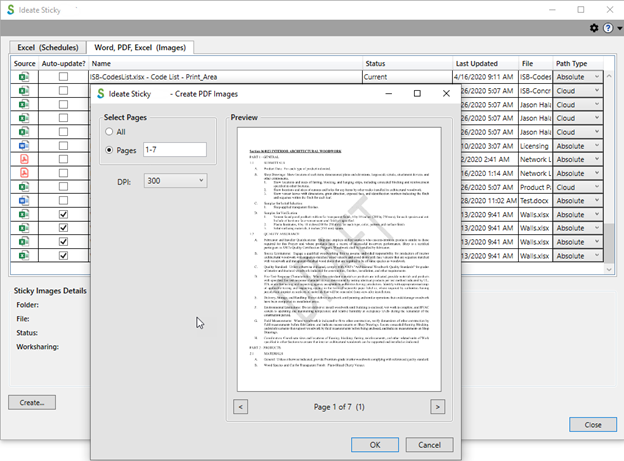
Word and PDF (Images)
Specify Word and PDF source documents by choosing the page range and DPI value. Pages can be specified as “All” or by typing in individual page numbers and/or ranges. Here are examples of acceptable page values:
- 2
- 1-3
- 1-3, 7
The default DPI value is 300. If it is changed, the new DPI will be remembered during that Revit session. The DPI value can also be adjusted later by using the Update From button.
Excel (Images)
Specify Excel source documents by selecting the worksheet region(s) available within any worksheet, as shown below, as well as the DPI value. The Name column represents available regions, which include saved Print Areas and named regions. These ranges can be viewed and edited within Excel from the Formulas>Name Manager dialog.
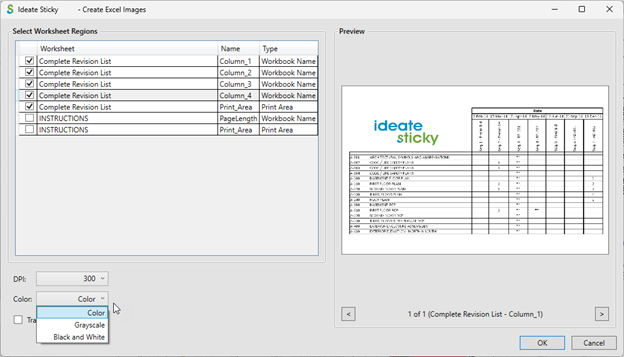
Color Overrides
Image Stickies can be created with a color, grayscale, or black and white override. If the Excel source sheet is set to black and white, the setting will take precedence over the drop-down selected when creating the Image Sticky. Find more details in this blog post.
DPI Overrides and Transparency
Higher DPI values will result in larger image files, potentially affecting the Revit model size more.
How to Create a Duplicate
Before duplicating a Sticky, you need to know if the original is a Sticky Schedule or a Sticky Image.
Duplicating a Sticky Schedule
To place a duplicate of a Sticky Schedule on another sheet:
- Open the Sheet view
- Using the project browser, locate the Sticky under the Schedule folder.
- Drag the Sticky onto the new Sheet.
Duplicating a Sticky Image
To place a duplicate of a Sticky Image on another Sheet or View:
- Select the existing image
- Copy the image with Ctrl+C.
- Go to another Sheet or View from within the active project or to another open project and use Ctrl+V to paste.
IMPORTANT: Images retain the original file pathing when pasted into other projects.
Explore recent posts


