Create New Revit Revision Sequences with Ideate BIMLink
You may know that you can create new Revit elements with Ideate BIMLink. Did you know that following a similar process, you can also create new Revit revision sequences?
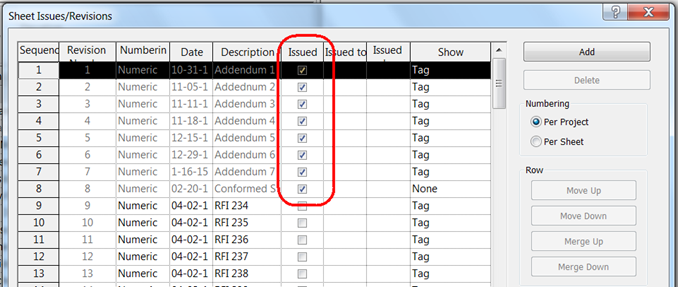
- Review Revision Sequences in Parent File
- Open a project with Revit. If the project has linked files, select the one that represents the primary source of revision data
- Select the Revision button from the Sheet Composition panel on the View tab
- You’ll see that any issued sequence will not be editable. Before opening Ideate BIMLink, uncheck the Issued box for the sequences you want to edit. Note: The editable fields for Revisions not issued are Date, Description, Issued, Issued to, and Issued by.
2. Edit Revision Data in the Parent File with Ideate BIMLink
- Launch Ideate BIMLink
- Hit Load Revit Sample
- Select “Revisions” from the list of samples
- Review the properties and hit OK
- Select Export Revit Elements to Excel then open the Excel file
- You can now edit any data within a cell that is white. Due to the nature of the Issued property, we recommend that you don’t edit it if you are editing other properties from the same sequence
- Save the changes to the Excel file and select Import Excel Values into Revit to complete the changes
- If you made a change to Issued, use Ideate BIMLink again to edit only this property or manually reset the property using the Revision button in Revit
3.
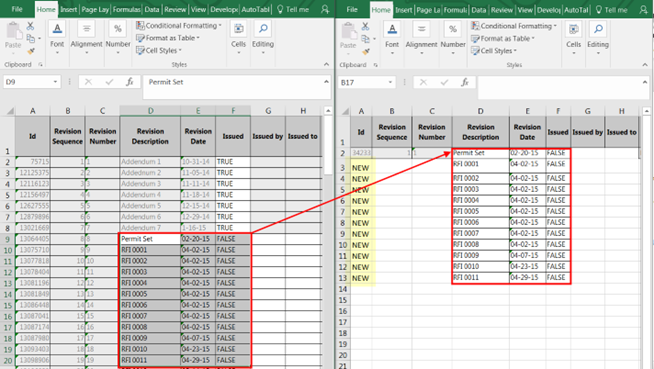
Copy Revision Data to a Linked File -
With Revit Revision data set up to standards, you can use the same data to create matching data in another file. The instructions below assume that the revision sequences have not been set up.
- Open the Revit project file that you would like to mirror in the Revision sequences defined within the original parent file.
- Launch Ideate BIMLink
- Hit Load Sample
- Select Revisions
- Review the properties and hit OK
- Select Export to save the results to a new Excel file and open that new file
- Copy the Excel data from the original file to the new file. See image below. Don’t copy data from Column A, B, or C
- Write the word “NEW” in Column A for each new Revision sequence to be created in the Revit project file. The values for Column B and C will be automatically setup by Revit when imported
- Hit Save in Excel and then Import in Ideate BIMLink to complete the changes
Browse our website to learn more ways you can use our Revit addins to streamline processes, improve model health, and elevate design.
Explore recent posts

TRAINING - VIDEO | Master even the most complex Revit export workflows with Ideate ExportHub, part of IdeateApps, and Ideate Automation.

TRAINING - VIDEO | Build powerful multi-format export packages with Ideate ExportHub, part of IdeateApps. Configure each export with custom sheet and view selections, naming rules, destination folders, and more.

TRAINING-VIDEO | Take control of your Revit exports with Ideate ExportHub, part of IdeateApps. Create fast, single-format exports with precise control over sheet and view selection, naming rules, destination folders, and more.

Discover what's new in Ideate Software 2027. This release introduces Ideate ExportHub, enhanced Ideate Automation workflows, dynamic sheet and view sets, improved cloud and Excel interoperability, and performance enhancements across the Ideate Software Bundle. Learn how these new features help Autodesk Revit users auto

