Managing Sticky Sizes
In Revit, the size of a Sticky is based on the named regions defined within the associated Excel worksheet. Ideate Sticky defaults to the defined print area (a type of named region in Excel), if available. Learn more: Preparing the Excel File in Ideate Sticky for Revit.
After the Sticky is created in Revit, it can be re-sized. Note: Any size changes will be overwritten if the Sticky is updated manually or automatically, so we recommend that changes to the size be made in the Excel file. In the Ideate Sticky Sample Files for Revit Modeling folder, you can try two Excel files setup to fit the height of a typical imperial and metric Revit sheet:
- ISB-Imperial E1 Size.xlsx
- ISB-Metric A1 Size.xlsx
How to Manage Multiple Pages
Because the Revit Schedule Header cannot be split, to divide a single Excel worksheet into multiple Stickies, use the Named Regions in Excel to define the size of each page and use Excel to repeat the rows along the top with each region.
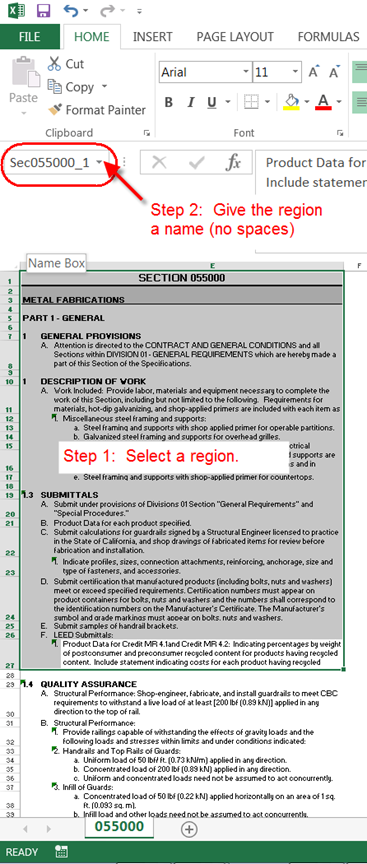
Make a Named Region in Excel:
- In Excel, use the mouse to select a number of cells. See image below. This is also known as a region.
- In the upper left corner, edit the name of the selected region. You can also right-click when the cells have been selected and select “Define Name.” NOTE: The region name can’t have any spaces. These regions can later be modified in Excel from the Formulas tab> Defined Names> Name Manager.
See examples of multi-page Stickies here Ideate Sticky Sample Files for Revit Modeling: ISB-Multi-Page_Spec.xls and ISB-Multi-page_Revisions-Fixed_Length.xlsx.
Repeat Rows at the Top
Ideate Sticky will use the ability in Excel to include certain rows with every region or print area defined, which is useful when dealing with long documents. To access this Excel function, go to the Page Setup tool and, within the Sheet tab, specify a range, such as $1:$5, to ensure that every page always includes these five rows.
Explore recent posts


