Creating Consultant Sheets for Master Index and DIR
Recently, I was fortunate enough to work with one of our customers on a challenge they were facing managing revision issuances for a large project with several revision issuances. While they were using our Document Issue Record (DIR) Excel template, which enables users to push out Revision Sequences and Revision on Sheet data to generate a comprehensive sheet list with each revision listed for each sheet, they ran into some troubles with how to include consultant sheets in the same DIR template, since the consultant sheets were not in their Revit models.
Limitations in Revit
While Revit allows users to create a sheet list and include linked element sheets as part of the sheet list, there are limitations that can arise, especially if one team is in charge with managing a master sheet index for an entire project. For example, if each team uses different sheet parameters or revision sequence names (can be problematic with the DIR), including linked elements in the master index may yield unwanted results. Since Revit does not allow changes to linked model data, the team in charge of the master sheet index may have to constantly ask their consultants to manage the information in their models in a very specific manner so that when the models are aggregated in a federated model, the information comes in correctly via the Sheet List.
Because of these situations, many architects request that their consultants send them a sheet list, so that they can manually generate the consultant sheets (typically as placeholder sheets) in their models, for the purpose of generating the master sheet index.
Expedite the Process with Ideate BIMLink
To expedite the creation of the placeholder sheets, we can use the Ideate BIMLink plugin for Revit. Depending on the situation, we have a couple of options to create the sheets:
- If the consultant models are linked into the project that will maintain the master sheet index, such as a federated model, then we can use Ideate BIMLink to report on the linked model sheets and use that sheet data to generate the new sheets using Excel. See below for detailed steps on how to create placeholder sheets using linked Revit models and Ideate BIMLink.
- If the consultant models are not linked into the project that will maintain the master sheet index, then we can use Ideate BIMLink to export the sheet parameter data we need (sheet name, number, appears in sheet list, etc.), and add the consultant sheet info to the exported Excel file and import the data back into the Revit model to create the placeholder sheets. For more information on this workflow, refer to this Help topic and this blog post.
Step-by-Step Instructions
The following steps outline how you can create consultant sheets from linked Revit models using Ideate BIMLink:
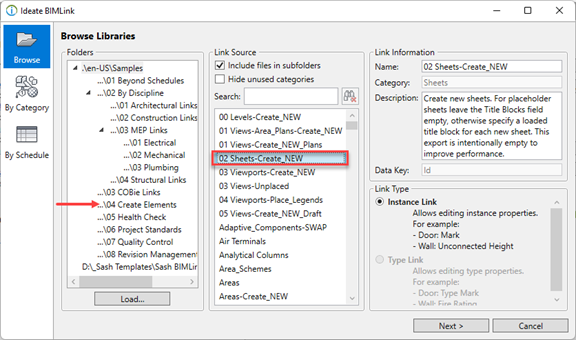
- In Ideate BIMLink, start with a pre-configured link called 02 Sheets-Create_New:
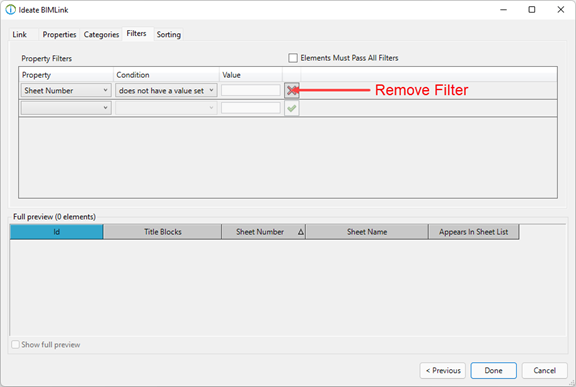
2. By default, this link is designed to filter out any existing sheets that exist in the project. Since we need to display the sheets from the linked Revit models, we will need to remove this filter:
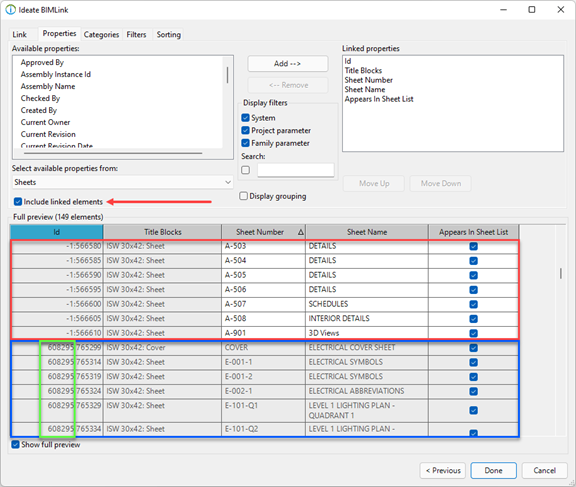
3. To reveal the sheets from the linked Revit models (the consultant sheets), check the “Include linked elements” option under the Properties tab. After doing so, you will see the primary sheets from the main model (highlighted in red), which has editable information, such as Sheet Number, Sheet Name, and Appears in Sheet List, and the sheets from the linked Revit models (highlighted in blue), which has non-editable information. The element ID numbers (highlighted in green) look different here, since we are displaying the element ID for the linked Revit models, followed by the element IDs of the sheets from the linked models:
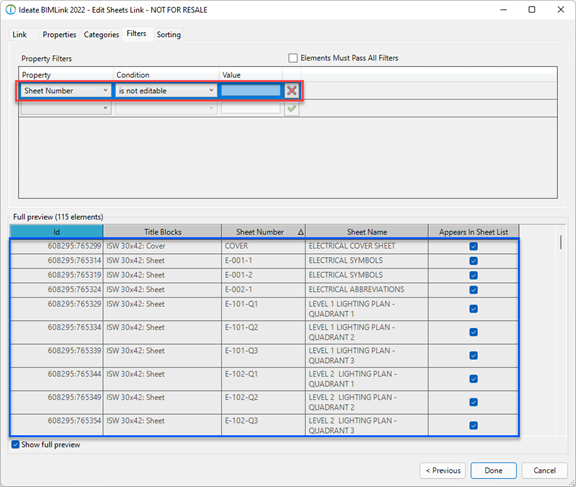
4. Before exporting this data to Excel, if you are interested in exporting only the linked model sheets (highlighted in blue), then return to the Filters tab and set the values to be Sheet Number is not editable. This will filter out all the sheets from the primary model and leave you with only the sheets from the linked models. If you will need to edit the sheet data from the primary model, while creating new sheets, then you can skip this step:
5. Once complete, export the information to Excel and open the Excel file to reveal the results:
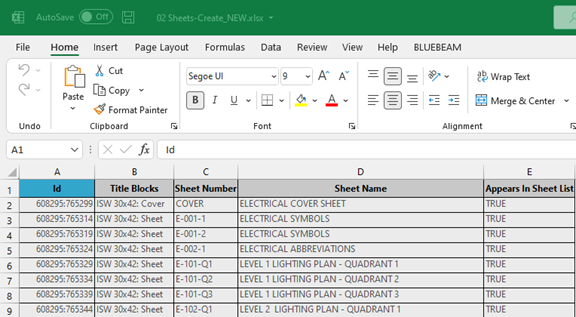
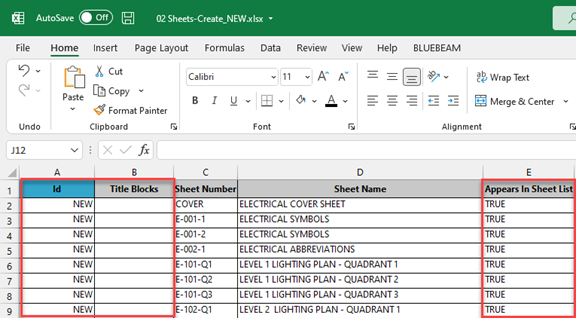
6. Since we are interested in creating placeholder sheets in the federated model by using the Sheet Name and Sheet Numbers from the consultant links, all we need to do is erase the element ID numbers (column A) and replace them with the word NEW. For the Title Blocks (column B), you have a few options:
- Leave the values blank, which will generate placeholder sheets. This is a typical workflow.
- Use the value: <None>, which will add the sheets to the Project Browser, without titleblocks. This is not a typical workflow, since views will not be placed on these sheets.
- Assign a loaded titleblock (family:type format, as seen in above image), which will add the sheets to the Project Browser, with titleblocks. This is not a typical workflow for consultant sheets, but a very typical workflow for creating new sheets in a primary model in which views will be placed.
Because we are interested in creating placeholder sheets for the consultant sheets, we will clear the existing values in the Title Blocks column. Finally, since we want these sheets to appear in the sheet index, we will ensure that the Appears in Sheet List value is set to TRUE for each sheet:
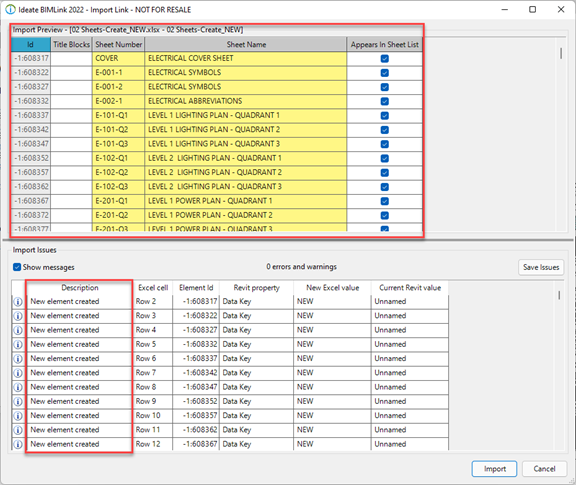
7. Once the data has been edited, save the Excel file and import the changes back into the Revit model using Ideate BIMLink:
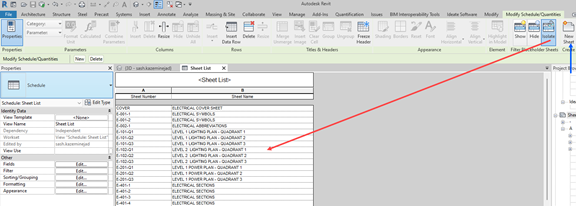
8. Verify that the new placeholder sheets have been created by either using the new sheet function (blue arrow) or by going to a Sheet List schedule and selecting the Isolate function under the Filter Placeholder Sheet panel in the Revit ribbon:
After your placeholder sheets are created, you can then modify any of the sheet information, such as Revisions on Sheets, and even use these placeholder sheets as part of your Document Issue Record (DIR).
More Training Tips
For additional training tips, check out our Training blog post series.
Send us an email with questions or visit our website to explore Ideate Software’s range of Revit tools and see how they can make your Revit projects faster, simpler and more accurate.
Stay Connected
Check us out on Twitter, LinkedIn, Facebook and YouTube.
If you have any questions, reach out to us. We are here to help you understand and use our Revit plugin solutions.
Explore recent posts


