Numbering Parking Along a Path with Ideate ReNumber
When designing a parking layout, updating the Tag information inside Revit can be frustrating. It’s easy with Ideate ReNumber!
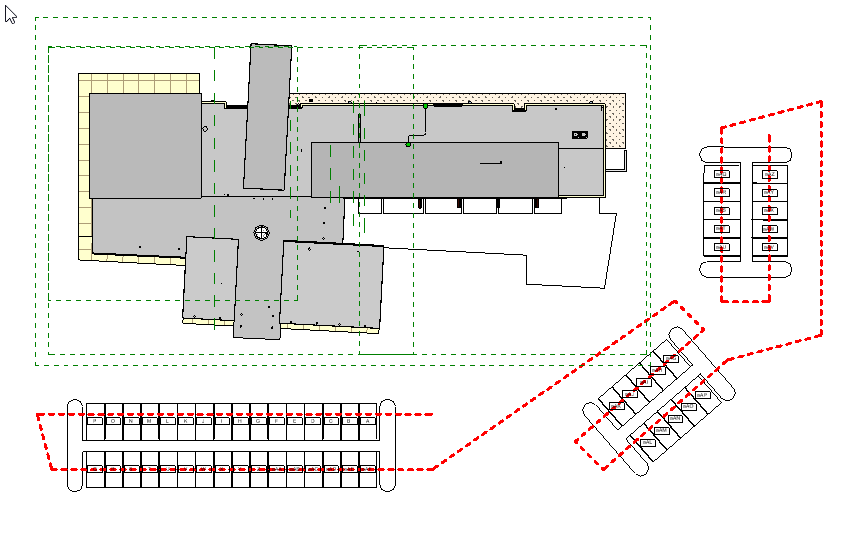
Numbering the Parking Spaces
- On a plan view, layout the Revit parking elements
- On the plan, draw a continuous detail line to demonstrate the order in which you’d like your parking spaces numbered
- Launch Ideate ReNumber
- Import the Parking rule from the Bonus Rules folder
- Select the “Select Path — Crossing” method button
- Select the “Start Numbering” button.
- Pick the detail line you drew in Step 2
- Ideate ReNumber will display the Preview dialog with all numbers for parking elements intersected by the path of the detail line
- Select “Accept Changes”
- Use “ESC” to close the application
Renumbering the Parking Spaces
If you think you might alter the design and want to keep the detail line, save it by either hiding in the view or by turning it into a group; you can delete the group instance from the view.
To renumber the parking spaces, follow these steps:
- If you’ve hidden the detail lines in the view, use the “Reveal Hidden Elements” tool to see the detail lines, then launch IdeateApps
- If you’ve saved the detail lines as a group, place an instance of the group on the plan and launch IdeateApps.
- Using the “Parking Rule,” repeat steps 5 through 9, above.
To modify your detail line layout, you can easily 1) add more line segments, 2) move them around, or 3) delete them all and start over. As long as they are continuous, Ideate ReNumber can use them to number by the path method.
Explore recent posts

TRAINING - VIDEO | Master even the most complex Revit export workflows with Ideate ExportHub, part of IdeateApps, and Ideate Automation.

TRAINING - VIDEO | Build powerful multi-format export packages with Ideate ExportHub, part of IdeateApps. Configure each export with custom sheet and view selections, naming rules, destination folders, and more.

TRAINING-VIDEO | Take control of your Revit exports with Ideate ExportHub, part of IdeateApps. Create fast, single-format exports with precise control over sheet and view selection, naming rules, destination folders, and more.

Discover what's new in Ideate Software 2027. This release introduces Ideate ExportHub, enhanced Ideate Automation workflows, dynamic sheet and view sets, improved cloud and Excel interoperability, and performance enhancements across the Ideate Software Bundle. Learn how these new features help Autodesk Revit users auto

