Renumber Rooms
Numbering Rooms and Spaces can be the most subjective of all numbering tasks.
- To number each Room or Space as it is selected, follow Method: Select Elements below.
- To number Rooms or Spaces along a line, follow Method: Select Path below.
The steps to number a Room, found below, can also be used to number Spaces. In the case of a linked file, where the Spaces related to the linked Rooms, refer to the ReNumber Spaces exercise.
In this exercise we the Revit sample file rac_advanced_sample_project.rvt.
- The file may already be installed on your computer at C:\Program Files\Autodesk\Revit 202x\Samples.
- Revit sample files from Autodesk are available for download 2020, 2021, 2022, 2023, 2024
Method: Select Elements
Steps to manually number the Rooms within the sample file specified above:
- Open "02 - Floor" plan view
- Launch Ideate ReNumber
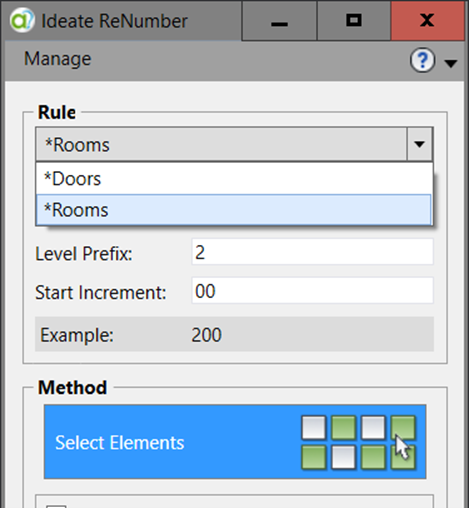
- The default Rule should be "*Doors." Switch the Rule to "*Rooms"
- Change the Level Prefix to 2.
NOTE: This field is optional and can be removed as a way of ignoring the field - Change the Start Increment to 00
- Pick the "Select Elements" method, then push the "Start Numbering" button
- On the floor plan, select the Room tags (or Room elements) to start renumbering the existing Rooms
NOTE: Revit will alert you to each Room that has a duplicate number. - When you are done, hit ESC to return to Ideate ReNumber.
- Try adjusting the Level Prefix to "2-" or "2." and then try the "Select Elements" method again
NOTE: There are no Revit warnings because these numbers are now unique, and not duplicates - Stop the numbering process by hitting the ESC key.
- Use the ESC key again or select the Red X to exit the dialog and return to Revit.
Try Method: Select Path next.
Method: Select Path
To automatically number the Rooms within the sample file specified above:
- Open "01 - Entry Level" Plan
- Launch Ideate ReNumber
- Set the Rule to "*Rooms"
- Change the Level Prefix to "1-"
NOTE: This prefix field is optional. The value can be removed to prevent this text from being included on the new number. - Change the Start Increment to 00
- Check the option to "Create New Path", then pick the "Select Path - Crossing" method
- Push the "Start Numbering" button
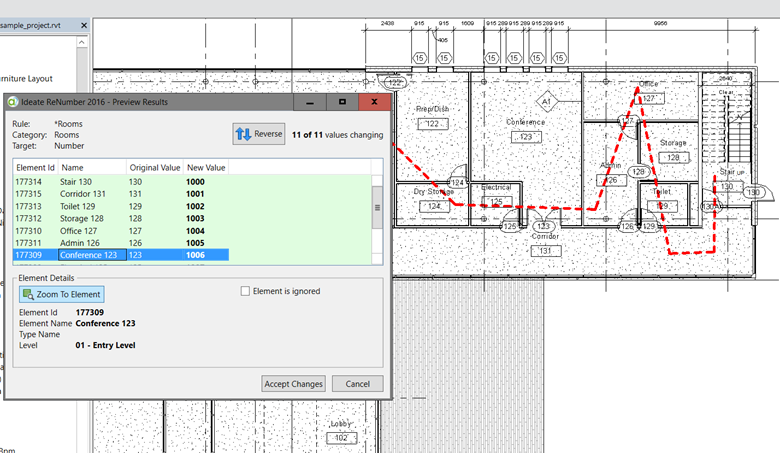
- Because you selected the option to "Create New Path" checkbox, the next step is to select a starting point for the path of your line. Any Rooms that intersect the line you draw will be numbered automatically by the order in which they cross the lines. See image below for a suggested path.
NOTE: The Detail Line can be drawn through Ideate ReNumber or can be drawn independently with the Detail Line tool in Revit. - When you are done drawing line segments, hit ESC to see a preview
- Select "Accept Changes" to complete the process and return to the main dialog
- Hit the ESC key or select the red X to exit the dialog and return to Revit
- Extend the last line segment by grip editing or by adding a new line segment, then try Ideate ReNumber again to see how easy it is to change the numbers
Explore recent posts

TRAINING - VIDEO | Master even the most complex Revit export workflows with Ideate ExportHub, part of IdeateApps, and Ideate Automation.

TRAINING - VIDEO | Build powerful multi-format export packages with Ideate ExportHub, part of IdeateApps. Configure each export with custom sheet and view selections, naming rules, destination folders, and more.

TRAINING-VIDEO | Take control of your Revit exports with Ideate ExportHub, part of IdeateApps. Create fast, single-format exports with precise control over sheet and view selection, naming rules, destination folders, and more.

Discover what's new in Ideate Software 2027. This release introduces Ideate ExportHub, enhanced Ideate Automation workflows, dynamic sheet and view sets, improved cloud and Excel interoperability, and performance enhancements across the Ideate Software Bundle. Learn how these new features help Autodesk Revit users auto

