
Bounding Boxes
As a lead developer on Ideate XRay, which uncovers the reason an element isn’t visible in a certain view, I had to deal with a lot of visibility issues. Many of the issues dealt with the geometry of an element and its position within the model. To resolve these visibility issues, I had to learn a lot about bounding boxes and how they work within Revit.
Every model element in Revit represents an object that takes up space and has a position. To simulate this, Revit uses objects called “bounding boxes.” Revit defines a bounding box as an invisible 3D rectangular space that contains a model element. These boxes are used to represent the geometry and position of an element, and they are important factors in the visibility of an element.
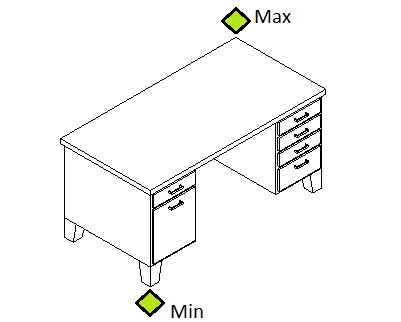
Behind the scenes, a bounding box is represented by the class “BoundingBoxXYZ.” This box has three main properties: Min, Max, and Transform. The Min and the Max are two points that represent the lower and upper bounds of the box, while the Transform represents its rotation relative to the model. These properties can be used to determine where an element is within a model by checking the coordinates of the element.Views also have bounding boxes. A view’s bounding box represents the crop box of the view. In plan views, the crop box represents the sides of the view’s bounding box, while the view range represents the floor and ceiling of the view. For section and elevation views, the bounding box of the view represents the sides, while the depth is represented by the far clip offset.
If the bounding box of an element does not intersect with the bounding box of a view in model space, the element will not be visible in that view. For most views, bounding box intersection is simple and only requires checking if the position of an element is within the bounding box of a view. Some views are not in alignment with the model coordinates and must use a transform. To check for element intersection in these cases, you would need to apply the inverse of the transform of the view onto the element to get the element’s position relative to the view.
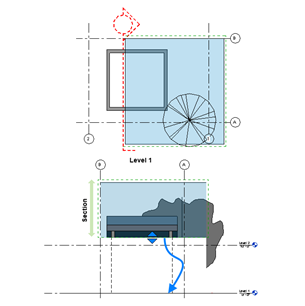
A view’s visibility can also be effected by bounding boxes. Sometimes when placing a view in another view, like a section, the view marker is not visible. This can happen for a few reasons, and one of them is bounding boxes. If a floor plan has an elevation in it and the bounding box of the elevation intersects with the bounding box of the floor plan, the elevation marker will be visible within the floor plan.
With rotations, transforms, view coordinates, and model coordinates, things can become confusing very quickly, especially when all you want to do is figure out where your element went. Ideate XRay will check your element’s bounding box and use that information to help you resolve visibility issues. Download the trial version of IdeateApps’ XRay to see how it simplifies the process of determining why an element isn’t visible in certain views.
Explore recent posts

SUCCESS STORY - VIDEO | Beyer Blinder Belle Architects were able to customize our Revit solutions to meet their company's specific needs. Thanks to our personalized solutions, BBB's team was able to have Ideate Automation run weekly exports overnight and export PDF files as sets by drawing type, run Ideate Automation command lines in Microsoft Power, and more.

TRAINING - VIDEO | In this 15@15 recording, you'll uncover the secrets to enhancing your documentation quality control process in Revit. Learn how to seamlessly add standard company/client standard abbreviations to a Revit custom dictionary, coordinated with Ideate SpellCheck.

EVENT | Designed to provide you with the best training available on the Ideate Software suite of tools, these 15-minute sessions are fantastic opportunities to enhance skills and maximize productivity.

TRAINING - VIDEO: Join us for an insightful exploration of how to streamline multiple MEP workflows with the Ideate Software suite of tools. Learn how to optimize quality control using Ideate BIMLink, efficiently manage MEP warnings with Ideate Explorer, seamlessly integrate Excel, Word, or PDF equipment/specification data into your Revit project with Ideate Sticky, gain a deeper understanding of Revit filter usage with Ideate StyleManager, and streamline renumbering and intelligent tagging with IdeateApps.